This tutorial will take you through all the tips and tricks you need to make your own textured food photography backdrops! It's so much cheaper and easier than you could imagine! This post contains affiliate links. If you click on a link and make a purchase, I receive a portion of the sale.

This post goes out to all my food photographer friends!
I've had my eye on all those expensive food photography backdrops you can buy for years, but have never been able to justify the purchase. What if I don't like it? What if it doesn't match my style? What if I never use it??
Finally I decided to try my hand at making a few myself since I knew I could always re-do it if I didn't like it and I wouldn't be sinking a lot of money into something I might not like. Well, turns out I'm obsessed with making backdrops! Like, I would do this for fun and hang it on my wall like art because I think they're so stinkin' beautiful.
I am the least hardware-savvy person you'll probably ever find, so don't be intimidated by a trip to the hardware store. That is to say, you need to go to Home Depot, Lowes, or Menards, those are hardware stores, right?! A few supplies can be ordered off Amazon.
This tutorial will walk you through everything you need to purchase, and you can always ask someone who works there to help you find it. It's going to be (relatively) cheap and easy, I swear!
Here's what you'll need for one double sided food photography backdrop:
- 1 wooden board in whatever size you want (I choose 2x2 or 2x4, 2x3 would also be good)
- Joint compound (affiliate link)
- Large joint knife
- 4-6 paint sample pots in your colors of choice
- 2 cheap kitchen sponges
- 1 medium size sponge brush (optional)
The Wooden Board
What you get here is entirely up to you. I like to choose something about ½ inch thick that is smooth and sturdy, but light enough that I can pick it up and move it around without too much trouble.
If I'm really planning ahead I will choose one that is about 2 feet x 4 feet and another that is 2 feet square. I will then give them the same paint job and use the smaller one as a standup background for straight on shots.
Joint Compound
I'll be honest, I don't even know what this stuff is. I found it near the paint by the stains and stuff to patch walls. What I like about the stuff in the photo is that it goes on pink and dries white, so you know when it's ready for the colored paint!

Joint Knife
Obviously, my joint knife is not super well cared for. Doesn't matter! The rougher the better on this project. I just like the large, flat surface for spreading the joint compound.
Paint Sample Pots
Choosing your paint colors is probably the hardest part of all of this. I selected a few inspiration photos ahead of time and used them to compare to swatches in the store.
Try to choose 4-6 colors. There should be 2-3 colors per side of your board.
For each side you'll want colors that are within the same shade (light, medium, and dark or white, medium, and dark). Take into consideration the type of food you will be photographing and consult a color wheel if necessary to see what colors work together.

Choose the flattest paint possible (not shiny), my store only carried Eggshell paint samples, which is fine, but Matte (or Flat) would be even better.
The colors I chose for this project were ones I had sitting around from other boards I made. There was a steely blue and a light gray, and I also used some white.
Kitchen Sponge
Seriously, choose the cheapest package of simple, rectangular sponges.
Sponge Brush
This also doesn't need to be fancy, just your basic sponge brush. Bristles won't work here.
How to Make Textured Food Photography Backgrounds
Clean Your Board
This doesn't need to be a deep clean, just make sure it's clear of any debris. If you purchased a rougher board, you may want to sand it and remove any dust from that.
The board I was painting was one I had tried to paint using another style, and... it obviously didn't work out. Good thing we're doing this instead!

Apply the Joint Compound

You'll want to use the joint knife to completely cover the board in joint compound, but here's where a little skill and practice come into play. After covering an area in joint compound, run the joint knife gently over the surface in alternate arching motions.
You want to create ripples and light lines that run in different directions to create movement and depth. If you don't like how it looks, just keep trying different amounts of pressure and adding more joint compound if necessary.
Once you like the texture, allow the joint compound to dry completely. This could take several hours to overnight.

Apply the Paint
Once your joint compound is dry, pour several pools of each different paint on the board. Using the rectangular kitchen sponge, spread out the paint, mixing and swirling so that it isn't just one color in any one space.

You also don't want to overmix because this would create one color as well. I like to use the sponge to spread out the colors, then dab it lightly to soften the look of the paint so it doesn't have a "wiped" look

You could actually skip the joint compound and use the sponge to paint directly on the wood board, which you can see on the board in the photo below.

You could also be done at this point if you're happy with how the board looks. I decided to go for a little more depth, because the texture in the joint compound is just too good to leave untouched!
Apply an Extra Layer of White
Once your paint layer is completely dry, use the sponge brush or another clean sponge to grab a little bit of white or your lighter color mixed with white. You want this to be a very small amount of paint. If you're familiar with dry brushing, that's what we're going for!
Lightly brush this light colored paint across the texture of the joint compound. You want the light paint to be on top while the darker colors come through in the cracks underneath. You can make this as pronounced as you want or not. I decided to make one half of my large board more white and textured, and leave the other a little flatter.

Once this layer dries, you can move on to the next side! I know some people apply a matte finishing spray to protect the finished surface, but I've never had a problem wiping food and stains off my board.
I've also never been able to actually FIND matte finishing spray (because I seriously know nothing about hardware stores), so I think you're ok with or without it!
How do homemade food photography backdrops look?
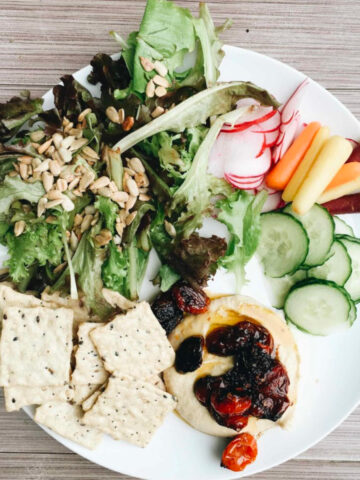
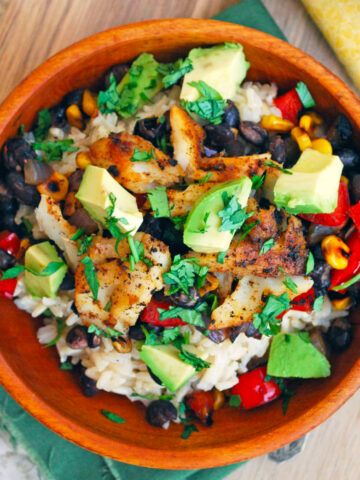
Homemade food photography backdrops help you stand out and define your style because they're 100% unique. Here's a photo taken with the background I was making in this tutorial.

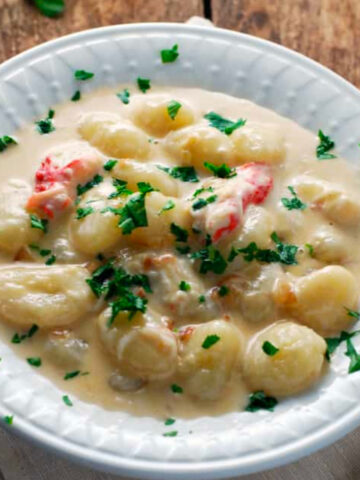
And here's another similar board I made in a different color scheme.

One of the great things about using colors all in one shade is that you can use Lightroom to alter the hue. For example, I could make the blue board super blue or completely greyed out. This is a good way to emphasize your food and coordinate colors with the food or your Instagram feed.
I hope this tutorial was helpful to you, if you have any questions or other favorite ways to make food photography backdrops let me know in the comments!


How to Make Textured Food Photography Backgrounds
Ingredients
- 1 wooden board in whatever size you want
- Joint compound
- Large joint knife
- 4-6 paint sample pots, in your colors of choice
- 2 cheap kitchen sponges
- 1 medium size sponge brush, optional
Instructions
Clean Your Board
- This doesn't need to be a deep clean, just make sure it's clear of any debris. If you purchased a rougher board, you may want to sand it and remove any dust from that.
Apply the Joint Compound
- You'll want to use the joint knife to completely cover the board in joint compound, but here's where a little skill and practice come into play. After covering an area in joint compound, run the joint knife gently over the surface in alternate arching motions.
- You want to create ripples and light lines that run in different directions to create movement and depth. If you don't like how it looks, just keep trying different amounts of pressure and adding more joint compound if necessary.
- Once you like the texture, allow the joint compound to dry completely. This could take several hours to overnight.
Apply the Paint
- Once your joint compound is dry, pour several pools of each different paint on the board. Using the rectangular kitchen sponge, spread out the paint, mixing and swirling so that it isn't just one color in any one space.
- You also don't want to overmix because this would create one color as well. I like to use the sponge to spread out the colors, then dab it lightly to soften the look of the paint so it doesn't have a "wiped" look
- You could actually skip the joint compound and use the sponge to paint directly on the wood board, which you can see on the board in the photo below.
- You could also be done at this point if you're happy with how the board looks. I decided to go for a little more depth, because the texture in the joint compound is just too good to leave untouched!
Apply an Extra Layer of White
- Once your paint layer is completely dry, use the sponge brush or another clean sponge to grab a little bit of white or your lighter color mixed with white. You want this to be a very small amount of paint. If you're familiar with dry brushing, that's what we're going for!
- Lightly brush this light colored paint across the texture of the joint compound. You want the light paint to be on top while the darker colors come through in the cracks underneath. You can make this as pronounced as you want or not. I decided to make one half of my large board more white and textured, and leave the other a little flatter.
- Once this layer dries, you can move on to the other side! I know some people apply a matte finishing spray to protect the surface, but I've never had a problem wiping food and stains off my board. I've also never been able to actually FIND matte finishing spray (because I seriously know nothing about hardware stores), so I think you're ok with or without it!
Amanda says
Thanks for such a great tutorial! It was easy to follow, and I love the texture. I've already made three boards with plans for many more.